Table of Contents
Introduction
We’re going to take you and your Helium Miner from Relayed to Online in this guide for configuring business-grade networks for Helium Mining.
FROM

TO

Identifying Your Miner
The first step in configuring your network is to identify your Helium Miner once it is connected to your Local Area Network (LAN). Your network equipment’s user interface will most likely provide a list of connected devices. Most devices will provide identifying information about its manufacturer or an ID including terminology about the type of device. All connected devices will have a MAC (Media Access Control) address. Our network equipment maps manufacturer names to a “Vendor” field and provided terminology to a “Hostname” field. Our Helium Miner provided no such identifying information, we only found a nonsensical alphanumeric string for Hostname and “Unknown” for Vendor – not very helpful.
Fortunately for us, we saw that the string and MAC Address combination would disappear and reappear when power cycling the device. Our network equipment allows us to assign a more user-friendly name a device once we configure it further. Once you figure out your device’s Hostname and MAC Address, you will want to make a note of this information for future refence.
Configuring DHCP and Fixed IP Settings
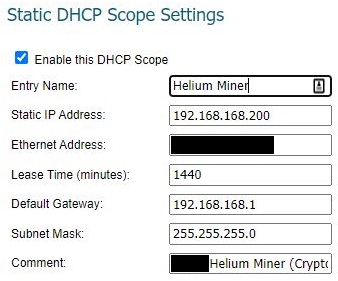
If we are going to go through the trouble of setting up special configurations for the Helium Miner to safely operate on the network, we need to ensure that these configurations are ALWAYS referencing the same device. Most network equipment and many internet-capable devices are set to operate using DHCP (Dynamic Host Configuration Protocol). This allows for wide compatibility and often easier setup out of the box. However IP (Internet Protocol) Addresses that are assigned by DHCP are only “Leased” and will be reassigned over time. Eventually configurations made for a device at one IP Address may end up not being applied at all. This can occur when the IP Address leases on the DHCP expire, and that IP Address is no longer assigned to any device. The other, much worse option can occur when the network configurations are no longer applied to your Helium Miner, because its previous IP Address – and network configurations – were reassigned to a DIFFERENT device! Our Helium Miner needs to be assigned a Static, or Fixed, IP Address. Our network equipment also functions as a DHCP server for client devices on our network. The DHCP Server settings allow us to set a scope of different IP Addresses to be Dynamic or Static and on different Interfaces – think Wi-Fi vs Ethernet (W0 for Wi-Fi and X0 for Ethernet in the picture below).
For our network and this interface, we only wanted a single Fixed IP Address. I wanted a nice, round number for our Helium Miner, so I selected “192.168.168.200” out of our existing range of IP Addresses. Again, for easy reference, I gave the range a contextual name and comment. The Ethernet Address field actually refers to the Helium Miner’s MAC Address. We didn’t want to change the Default Gateway. This value for the Subnet Mask allows the network to have up to 256 unique IP Addresses on the related network. You will want to make a note of the Fixed IP Address you chose for your Helium Miner.
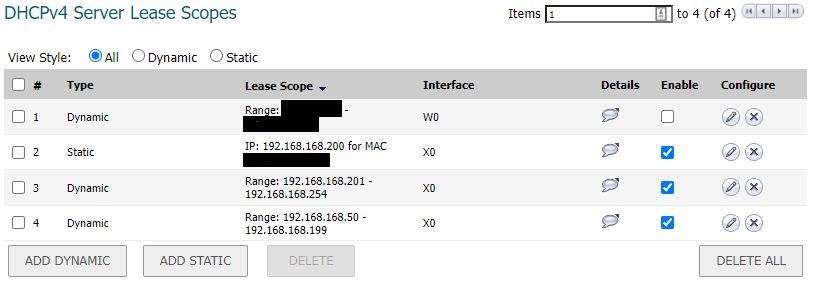
By selecting “192.168.168.200” as the Fixed IP Address, I parsed the original Dynamic Address Scope. The DHCP Server automatically set the original Dynamic IP Scope to “192.168.168.50 – 192.168.168.199”. Since our original IP Address scope was from “192.168.168.50 – 192.168.168.254” and I made the Fixed IP Address scope “192.168.168.200”, I had to make a separate Dynamic IP Address scope to cover the “192.168.168.201 – 192.168.168.254” range. Having these 3 Scopes defined enables the DHCP Server to assign all of the originally available IP Addresses. Larger networks would NOT want to accidentally limit the number of available IP Addresses by parsing the Dynamic IP Address scope and not reallocating the rest of the available IP Addresses.
Assigning User-Friendly Names – Address Objects
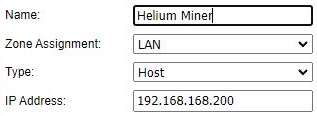
Now that we have a Fixed IP Address assigned to our Helium Miner, we can take the next step and assign a user-friendly name to that Fixed IP Address, which is on the LAN Zone of our network. For our Helium Miner setup, I decided not to complicate things and named it “Helium Miner”. In the configuration for our network equipment, this is called an Address Object. For this setup we will be using 2 Address Objects. The first will be the custom Address Object “Helium Miner” we just created and the second will come from the initial setup of our business’s network. The “Default Active WAN IP” Address Object stores our WAN Zone fixed IP Address, which is external and outward-facing.

Assigning User-Friendly Names – Service Objects
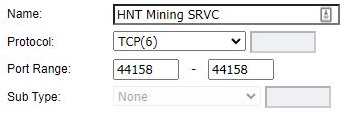
Our work to this point allowed us to configure network settings for our Helium Miner so that will persist. The next step is to define the service that is standard for Helium Mining. Helium Mining operates over Port 44158 using the TCP Protocol. The Port value is the same both on the LAN side and the WAN side. Our network equipment saves these values as Service Objects. Again, I decided to keep things simple and named our custom Service Object “HNT Mining SRVC” for Helium Mining Service.

Directing Traffic – Access Rules
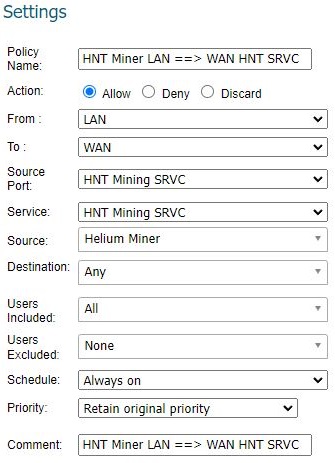
It’s time to start getting connected to the rest of the Helium Mining network. We need to put together many of our previous configurations into a rule to let our Helium Miner connect out from the LAN side to the WAN side using the Helium Mining Service we configured. Since we don’t have a specific external Helium Mining host to connect to, we want our Helium Miner to connect to any host operating on the same Helium Mining Service Port and Protocol. I chose to give my rule a very descriptive name to indicate the Address Object, the direction of the traffic, and the Service Object.
To summarize: traffic is to only go from the Local Area Network (LAN) to the Wide Area Network (WAN) using the TCP protocol on port 44158 originating from the device on LAN IP Address 192.168.168.200 to any remote host using the same protocol and port.
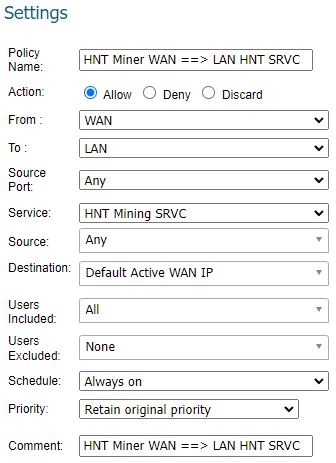
We also want other hosts on the Helium Mining network to be able to connect inbound to our Helium Miner. The adjacent Access Rule allows our network equipment to accept traffic from WAN hosts to our WAN IP over the Helium Mining Service.
To summarize: traffic is to only go from the Wide Area Network (WAN) to the Local Area Network (LAN) using the TCP protocol on port 44158 originating from any WAN host to the fixed WAN IP Address for the Helium Miner’s network.
Directing Traffic – NAT Policy
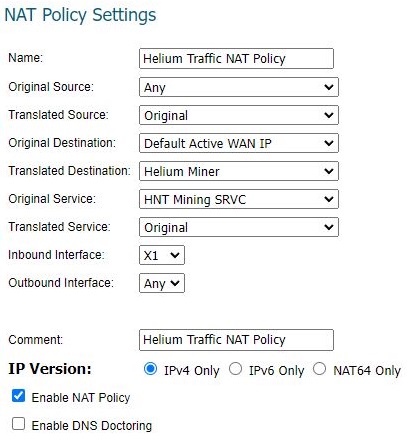
Last, but not least, we must ensure that inbound Helium Mining traffic actually makes it to our Helium Miner and only our Helium Miner. For many networks, all of the connected LAN client devices will be visible on the WAN side under a single External IP. We do not want Helium Mining traffic trying to connect to a printer, laptop, gaming console, or any other LAN host – again, only our Helium Miner. We do NOT want to grant WAN traffic broad access to our LAN network for security reasons.
Network Address Translation (NAT) policies allow network equipment to restrict traffic on a granular level. Using the adjacent NAT Policy, our network equipment looks for any incoming WAN traffic trying to connect to the external “WAN IP” using only the Helium Mining service. This traffic is directed ONLY to the Helium Miner.
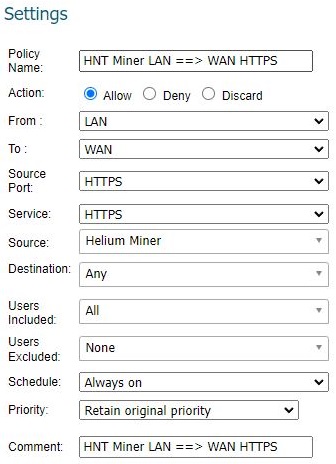
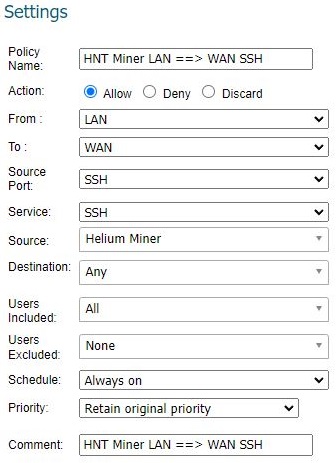
Optional Access Rules
In some network setups, it may be necessary to grant your Helium Miner access to other services. Here are examples that open ports for the Helium Miner to have LAN to WAN access to HTTPS and SSH services. This may be helpful for connecting your Helium Miner to remote servers for non-Helium Mining purposes like updating firmware.